näin tikkaan useamman spiraalin. how to stitch more than one spiral.
Olen kirjoittanut suomenkielisen ohjeen spiraalitikkausta varten. Nyt näytän, miten tikkaan useamman spiraalin muodostaman kuvion.
Here’s how I stitch a pattern of spirals.
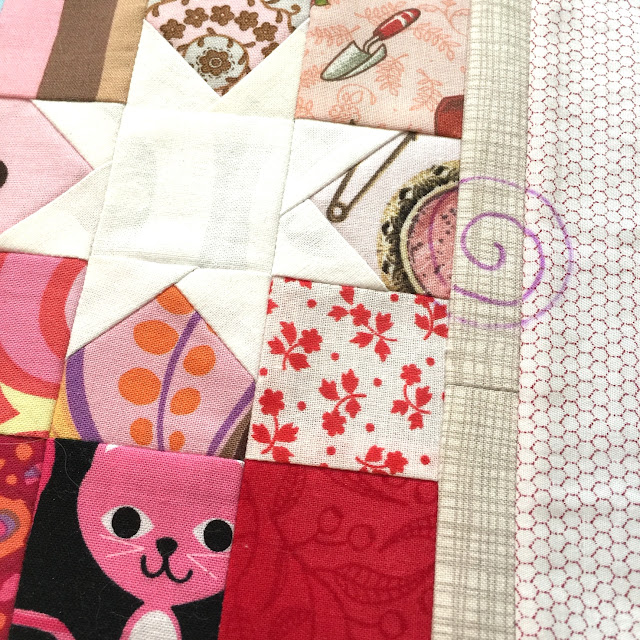
Valitsen tilkkupinnasta ensimmäisen spiraalin aloituskohdan. Piirrän siihen lankarullaa mallina käyttäen ympyrän, jonka sisälle piirrän spiraalin aloitusviivat malliksi. Käytän tietysti häviävää tussia.
I pick a place to start the first spiral. I take a disappearing marker pen and draw a circle using a spool of thread as a template, then draw the very beginning of the spiral free hand.
Valitsen aloituskohdaksi muun kuin keskikohdan tai lähes keskikohdan. Jos kuvio on liian lähellä keskikohtaa, mutta ei ihan osu siihen, valmis tuote saattaa näyttää hivenen epäonnistuneelta. Pidän enemmän siitä, että tuote näyttää tarkoitukselliselta.
I don’t like to start in the center of the piece, but a little to the side. This is because if the spiral starts very close to the center but not quite, the finished product may look a bit off. I prefer my zipper pouches to look intentional rather than near misses.
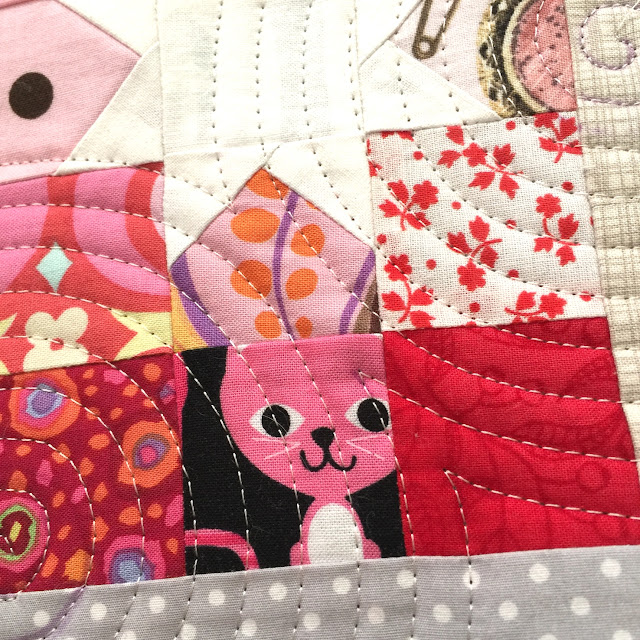
Aloitan tikkaamisen keskeltä. Käytän ensin lyhyttä pistoa ja seuraan piirtämääni viivaa. Kun olen edennyt kierroksen, pystyn käyttämään edellisen kierroksen tikkausviivaa apuviivana. Ompelen paininjalan päästä edellistä tikkausta.
Stitching starts in the middle. I use a short stitch length in the beginning and follow the line that I’ve drawn. When I’ve completed one full round, I can use the previous round’s stitching line as a guide. I keep a presser foot width as distance.
Pidennän pariin otteeseen piston pituutta. Ompelen ensin tosi hitaasti, pysähdyn ja käännän usein, jotta ompeleesta tulee pyöreä eikä kulmikas.
Since I started with a short stitch length, I lengthen the stitch a couple of times during the spiral. At first I sew really slowly, stopping and turning the piece often, so that the stitch line stays round.
Lopetan ensimmäisen spiraalin tikkaamisen jossain vaiheessa, jotta voin aloittaa toisen. Tällä kertaa keskeytin, kun tikkausviiva eteni tilkkupinnan reunaan saakka.
At some point, I will stop creating more of the first spiral so I can start on the second one. Here I stopped when my stitches reached the edge of the patchwork piece.
Piirrän uuden spiraalin aloituksen samalla tavalla kuin edellisenkin. Ompelen spiraalia, kunnes ommelviiva ylettyy edellisen spiraalin alueelle. Pysähdyn ommelviivojen puolivälissä ja lähdenkin sitten seuraamaan edellisen spiraalin ulkoreunaa.
I draw the new spiral just like I drew the first one. I sew it the same way until I get close to the previous spiral’s stitching line. I stop when my current stitches are a presser foot distance from both outside edges and then start following the line of the first spiral.
Kuvassa näkyy useampi tällainen kohtaamispiste.
This picture shows several of such meeting points.
Sitten vain seurailen aina edellistä tikkausviivaa paininjalan etäisyydeltä, tällä tavalla:
Then I continue stitching, following the previous line at the presser foot’s distance, like this:
Tikkaan koko pinnan – paitsi pussukkakappaleiden alanurkat, joihin tulee pohjan kulmasauma.
I keep going until the whole surface is quilted – except when I’m making pieces for zipper pouches. There, the lower corners do not need to be completely stitched because they will become boxed corners.
Ompelen koko ajan aika hitaasti ja huolehdin siitä, etten väännä kappaleita. Jos vauhti kiihtyy ja etenen huolettomasti, alemmat kerrokset ajautuvat helposti vinoon. Silloin saattaa johonkin nurkkaan jäädä vanukerrosvajaus.
I sew rather slowly the whole time and take care not to distort the pieces. If I speed up and become too careless, the batting easily starts shifting at each round of a spiral. Then, a corner might become bare of batting.
Tähän tikkaukseen kului aikaa noin 40 minuuttia. Tämä ei siis ole mikään pikatikkausvinkki, mutta kuviona spiraalit ovat tosi kivoja!
It took me around 40 minutes to stitch these two spirals. In other words, this is not a tip for quick stitching. However, spirals are really neat as a quilting pattern, I think!


Comments
greetings Gudrun
I like your quilting.
Dollandesign
Marilyn