ompele tilkkublokki, jossa on kaari. sew a quilt block with a curved shape.
Esittelin aiemmassa blogikirjoituksessani kaariblokkeja ja nyt kerron, miten itse ompelen ne.
Here’s how I sew a quilt block that has a curved shape in it.
Lähtötilanne. Leikkuualustalla on kaksi noin 16 cm x 16 cm –kokoista tilkkuneliötä, kumpikin oikein päin. Värit saavat olla toisistaan hyvin erottuvat, esimerkiksi toinen vaalea ja toinen tumma. Palojen ei tarvitse olla tarkalleen saman kokoisia, mutta ne on hyvä asetella niin, että yksi kulma on tasan.
Starting point. I’ve stacked two contrasting fabric squares (contrasting by colour, or light/dark contrasting), size around 6” x 6” on my cutting mat. They don’t need to be exactly the same size, but place them so that one corner is even.
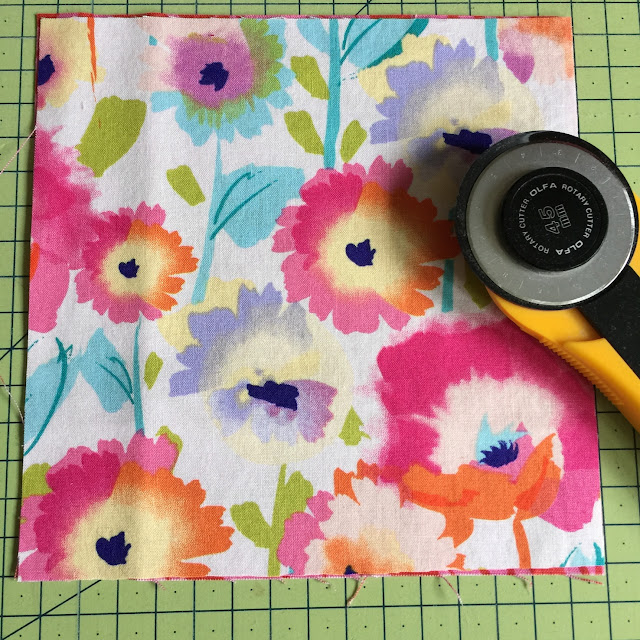
Leikkaan vapaalla kädellä ja leikkurilla tasan olevaan kulmaan kaaren. Kaari voi mutkitella. Sen ei tarvitse olla neljännesympyrän muotoinen.
I use the rotary cutter and cut a free hand curve in one of the corners. The curve may be uneven and it doesn’t have to resemble a quarter circle. This is improv cutting.

Seuraavaksi ompelen vaaleampaan kankaaseen tumman nurkkapalan ja päinvastoin.
Next, I sew the corner pieces back to the larger piece, but I switch them. Dark corner to the light fabric and vice versa.
Kaareva sauma on helppo ja nopea ommella ilman nuppineuloja! Opettelin tekniikan ommellessani juoponpolkublokkejani ja katsoin mallia tästä Leanne She Can Quilt -blogin videosta.
Sewing a curved seam is really quick and easy to sew without pinning! I learned the technique when I was sewing a bunch of Drunkard’s Path blocks, and here’s the tutorial video by Leanne from She Can Quilt.

Juoponpolkublokkien osat leikataan yleensä mallineen avulla, ja malline sisältää saumanvarat. Reunat menevät silloin tasan ja valmis juoponpolkublokki on melko tarkasti neliömäinen.
When one is sewing Drunkard’s Path blocks, one cuts the pieces using a template which includes seam allowances. Everything ends up even in that case and the block, when ready, is an even shape.
Tässä blokissa reunat eivät mene tasan! Sitä ei kannata ihmetellä. Tässä onkin mainio tilaisuus kaarevien saumojen ompeluharjoituksiin. Ellet ole kokeillut, niin suosittelen! Leikkaa ensimmäisiin blokkeihisi loivat kaaret, niin harjoitteleminen on vielä helpompaa.
The edges do not end up even in this block! Please do not stress over this. In fact, you have an excellent opportunity to practice sewing curved seams because this is going to end up wonky anyway. If you haven’t tried the no-pin method for curved seams, this is your chance! To make things even easier for you, cut a mild curve – it is easier to sew.
Kun olen vaihtanut nurkat, leikkaan lyhyet hakit saumanvaroihin niille kohdille, joissa pidempi kangas aaltoilee (ympyröity kuvassa):
When I have changed the corners, I snip the seam allowances in the places where the longer fabric edge is wavy (circled in the next picture):

Silitän saumanvarat nurkkapalan suuntaan. Käsissäni on kaksi blokin alkua:
I iron the seam allowances toward the corner piece…aaand I have two progressed blocks in my hand:

Asettelen palat taas päällekkäin ja niin, että saumat kulkevat hyvin tarkkaan samassa kohdassa. Leikkaan toisen kaaren. Se voi olla toisesta päästä leveämpi tai keskeltä, tai miten haluat (mutta muista, että saumanvara syö kaaripalan leveyttä).
I stack the pieces again so that the seams are aligned. Then I cut another curve. The curve may start wider at one end, or widen in the middle, or whatever you feel like (but remember that the seam allowance will eat up the width of the curved piece).

Ompelen seuraavaksi kulmapalat toisiin paloihin. Teen hakit saumanvaroihin ja silitän varat poispäin kaaresta, näin:
Then I sew the corners to the other pieces (again switching the corner pieces). I snip the seam allowances and iron the seam allowances away from the curve like this:

Ta-daa! Kaksi kaariblokkia!
Ta-dah! Two quilt blocks with a curve!

Kuten kuvasta näkyy, kaariblokit ovat epämääräisen muotoiset ja kokoiset valmiina. Ne täytyy tasoittaa ja siinä vaiheessa kangasta menee tuhlaavaisen oloisesti hukkaan.
Vinkkaankin kaariblokin erinomaiseksi vaihtoehdoksi, johon kuluttaa kangasylimäärää!
You can see in the picture that the final curve blocks are very uneven in shape and size. One needs to trim the blocks and this means a waste of fabric. Hint, hint – this block is an excellent choice when you need to put some excess fabric into use!

Kommentit
Dolores (Typy)